Project Overview
The Anonymous User Tracker is a sophisticated, real-time analytics platform designed to monitor and visualize visitor behavior without requiring user registration or login. It provides website owners with deep insights into their audience through a premium, data-driven dashboard.
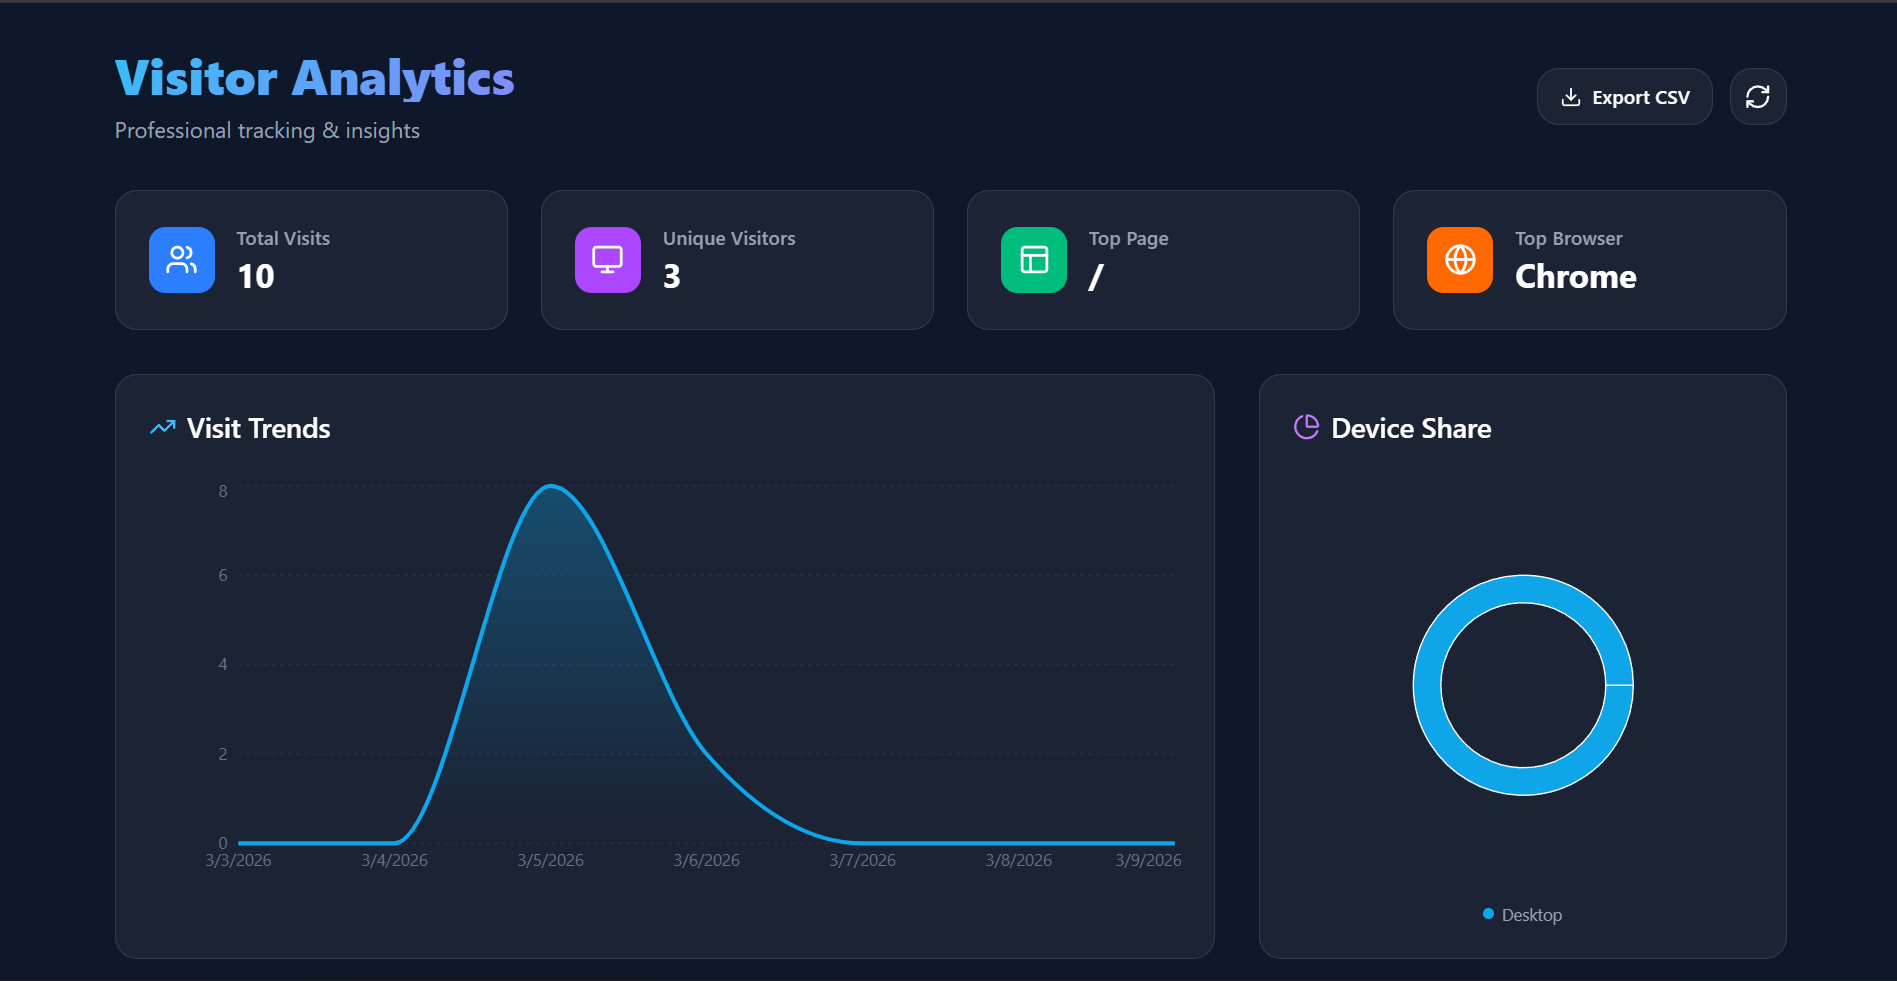
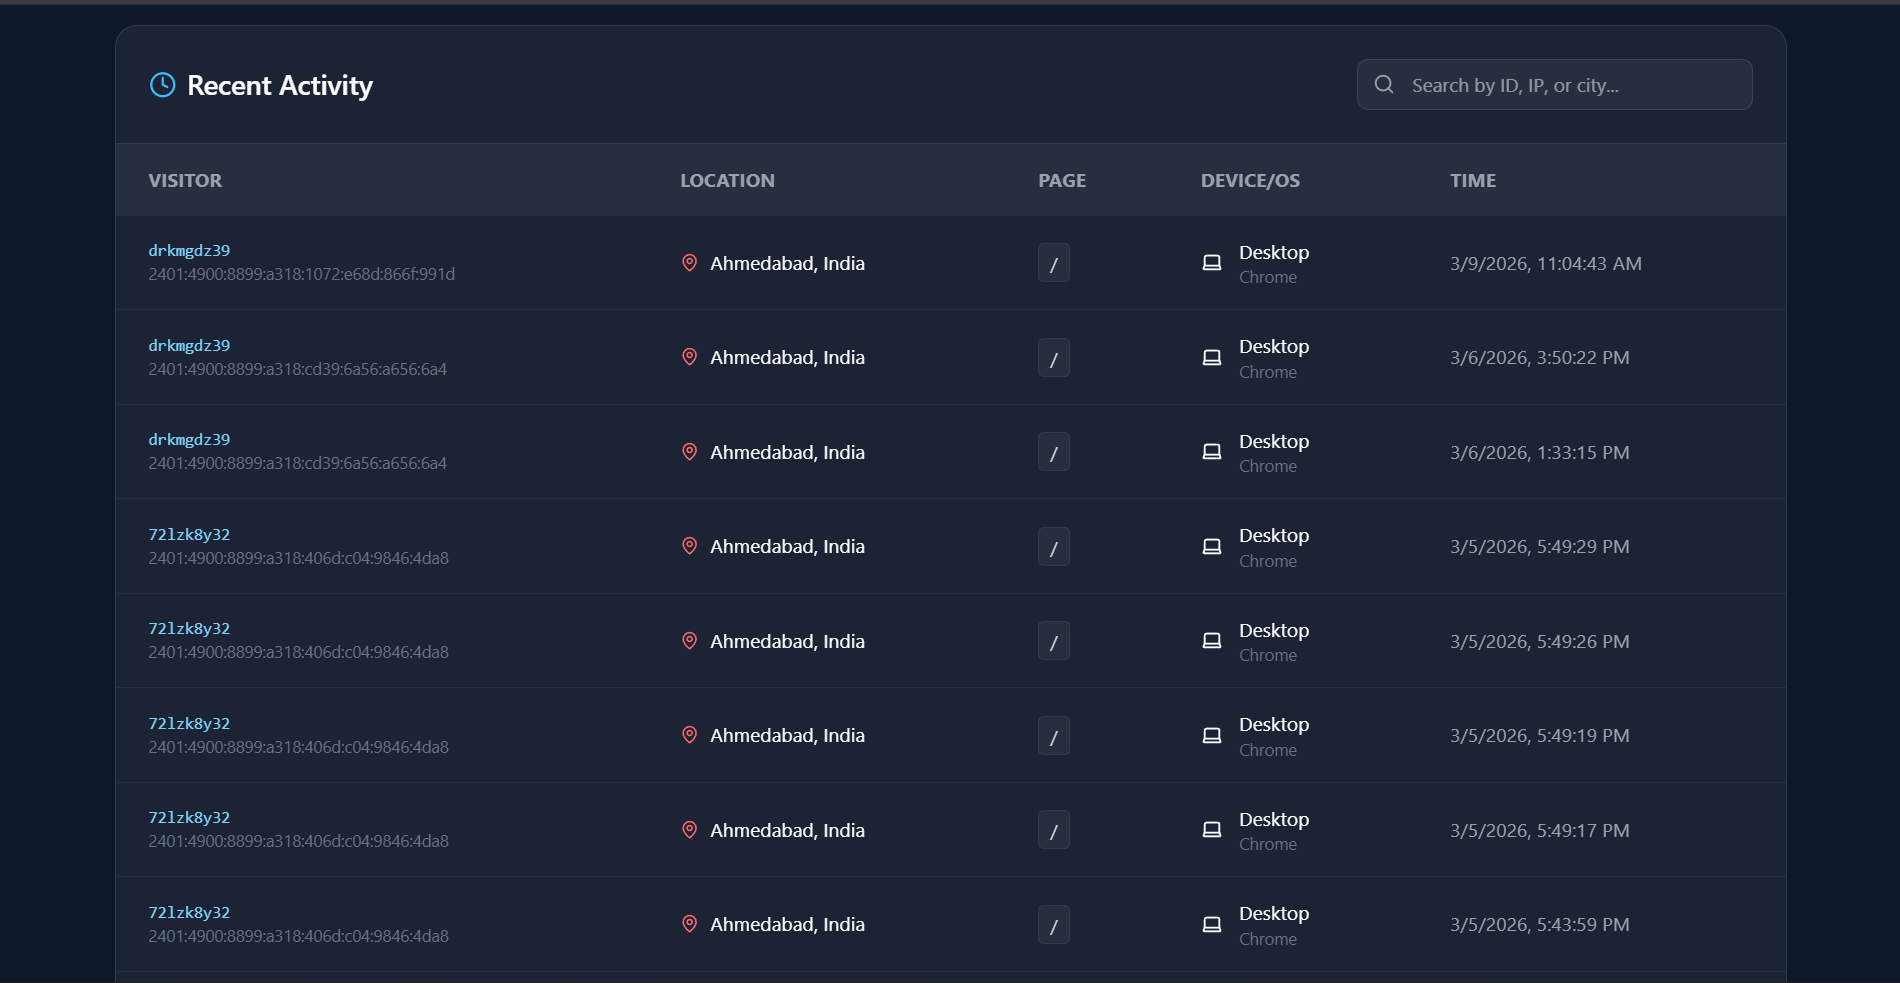
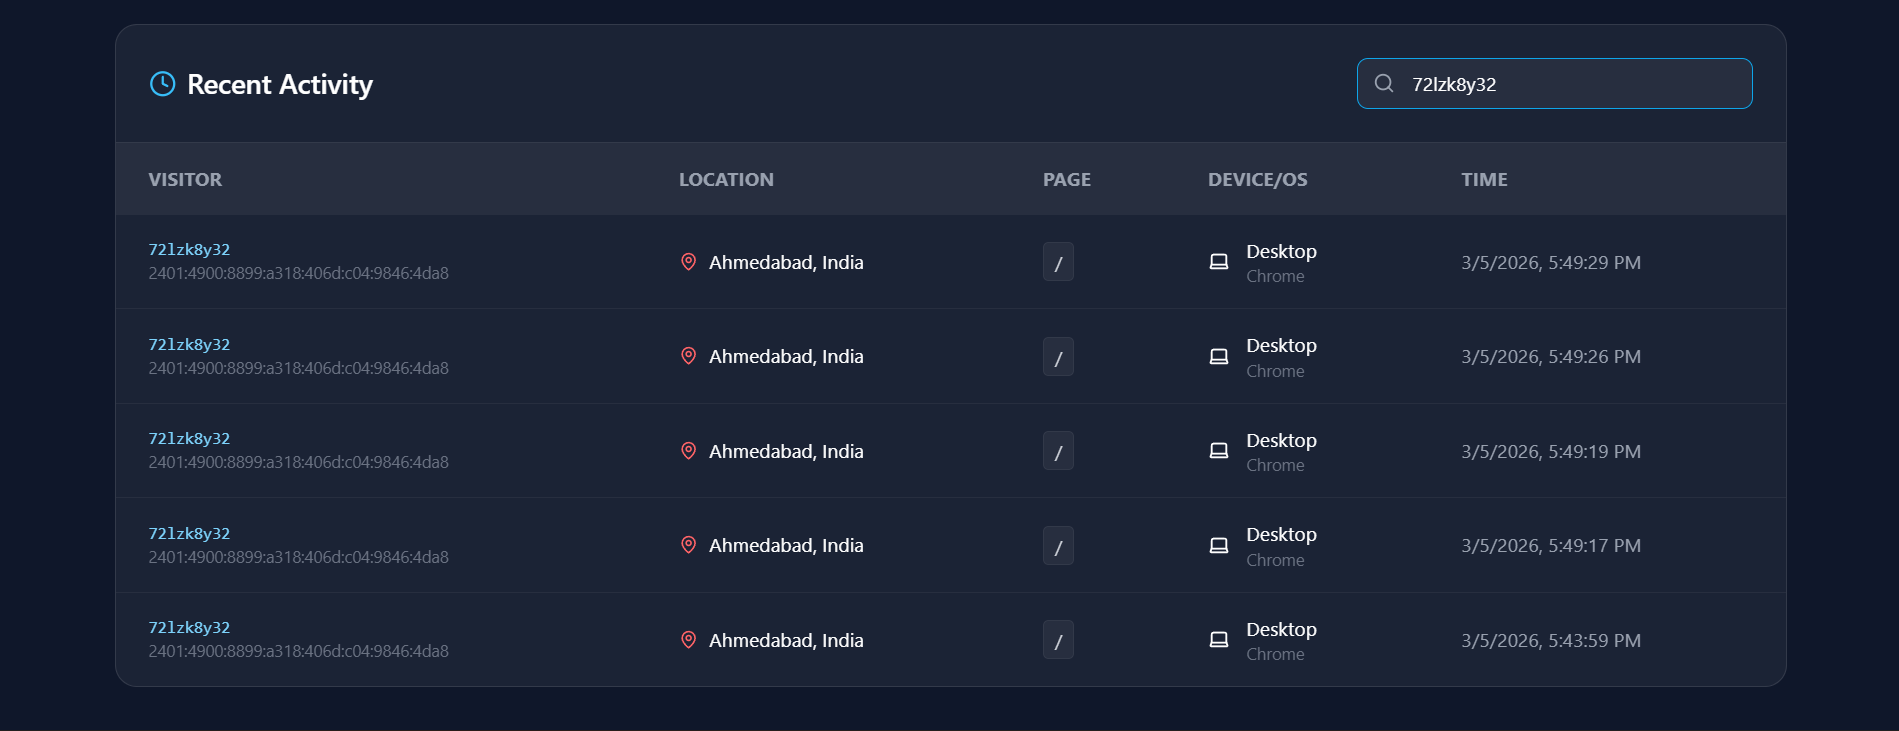
Screenshots
Key Features
- Zero-Configuration Tracking: Automatically captures visitor data upon page load without any user interaction.
- Real-time Geolocation: Identifies the city and country of every visitor using advanced IP-to-location mapping.
- System Profiling: Detects device types (Mobile, Tablet, Desktop) and browser versions for compatibility analysis.
- Interactive Data Visualizations: Real-time charts showing traffic trends and device distribution.
- Smart Activity Log: A searchable, filtered table of all recent visits with detailed metadata.
- Professional Data Export: One-click “Export to CSV” functionality for deep data analysis in Excel or BI tools.
- Persistent Identity: Generates a unique, persistent visitorID to distinguish between new and returning visitors anonymously.
Functionality
- Ingestion: A lightweight background component (Tracker.jsx) collects IP, location, browser, and page data.
- Storage: Data is sent via a secure API to a Node.js/Express backend and persisted in a MongoDB database.
- Visualization: The frontend fetches this data and transforms it into visual insights using Recharts.
- Management: Admins can search for specific IP addresses or visitor IDs and monitor live traffic spikes.
Technology Used
- Frontend:
- React 19: For building a dynamic and responsive user interface.
- Vite: A fast build tool for a smooth development experience.
- Tailwind CSS 4: Used for modern, utility-first styling.
- Axios: For making API requests to the backend.
- React Router Dom: For handling client-side navigation.
- API/Data: ipapi.co(Geolocation Service)
- Backend:
- Node.js & Express 5: Powering the RESTful API.
- MongoDB & Mongoose: For flexible, document-based data storage.
- BcryptJS: For secure password encryption.
- JSON Web Token (JWT): For stateless user authentication.
- CORS: To handle cross-origin requests between the client and server.
Why This Project Is Useful
- Privacy-First Analytics: Collects essential business data without compromising user identity or requiring intrusive cookies.
- Marketing Insights: Understand exactly which pages are most popular and where your global audience is located.
- Technical Optimization: Identify the most common devices and browsers to prioritize design and performance updates.
- Security Monitoring: Real-time IP tracking helps identify suspicious traffic patterns or bot activity.
- Data Portability: The CSV export feature allows for seamless integration into existing business reporting workflows.
Deployment and Environment Setup
- Environment Variables Setup:
- backend/.env
- PORT: 5000
- MONGO_URI: mongodb_url_string
- JWT_SECRET: your_jwt_secret_key_here (if needed)
- frontend/.env
- VITE_API_URL: backend_url
- backend/.env
- Deployment Overview:
- Render or Railway for backend hosting
- Vercel or Netlify for frontend hosting
- MongoDB Atlas for the database
- Backend Deployment:
- Push your code to GitHub.
- Go to Render.com or Railway.app.
- Create a new Web Service and connect your GitHub repository.
- Choose “backend/” as the root directory.
- Add the following environment variables on Render:
- PORT=10000
- MONGO_URI=your MongoDB Atlas URI
- JWT_SECRET=your JWT secret
- Start command: npm start (Ensure your backend/package.json includes “start”: “node server.js”)
- After deployment, note your backend URL, e.g. https://your-backend-name.onrender.com
- Frontend Deployment:
- Go to Vercel.com or Netlify.com.
- Create a new project and connect the GitHub repo.
- Select the “frontend/” folder as root.
- In environment variables, set:
- VITE_API_URL=https://your-backend-domain.com/api (or REACT_APP_API_URL if using CRA)
- Deploy.
- MongoDB Atlas Setup:
- Go to https://cloud.mongodb.com
- Create a free cluster.
- Add your current IP address in Network Access.
- Create a database user and password.
- Copy the connection string and replace username, password, and database name in MONGO_URI in backend/.env
Download Source Code
Project Setup Instructions
Note: This project is for educational purposes only. Not for commercial sale.


